ASP.NET Core Swagger Documentation
Documentation is one of the most effective methods for transferring knowledge about an entire project or a subset of it. The documentation can assist others in comprehending how it works and can also be used as a reference for when someone want to verify that his or her assumptions are right.
However, the primary advantage of documenting before or throughout the development process is that it can bring to light issues or ideas that no one else would have considered.
Thus, this article is about documentation using the Swagger framework; the first section provides an overview, while the second section details the actual implementation. A subsequent article will discuss Swagger documentation with Bearer Token authentication.
Introduction
Swagger is a component of the OpenAPI Initiative and can be used with a variety of other languages, including Java, Spring, and Python. And it includes a number of tools, like Swagger Hub, which can be used to define Web APIs without using a programming language to describe it; and Swagger Inspector, which is a tool for testing API endpoints. However, this article will focus on the Swagger Specification in conjunction with ASP.NET.
The Swagger Specification framework makes use of .NET generated documentation, which I will describe how to enable later, and a UI component that visually illustrates the Web API endpoints, which include the following:
- HTTP method of request (e.g. GET, POST);
- parameters and query parameters;
- response codes (e.g., OK, NotFound);
- a description of the endpoint, its parameters, and the type of return;
Prerequisites
For this article the default ASP.NET Core project was generated, that means the WeatherForecastController will be used in order to describe the API.
As was previously mentioned a file is needed by the Swagger Framework in order to create the documentation. So to generate this file, the GenerateDocumentationFile property in the ASP.NET Core project must be set to true.
1 | <PropertyGroup> |
By enabling this in the project’s settings file (i.e. csproj), then when the project is being built, the compiler will search for the XML comments and will generate an XML file containing all the written comments [1], in the following format.
1 | <doc> |
We don’t need to worry too much with the look of this XML file; it’s simply for demonstration purposes.
In the top part, the assembly name is found, meaning that if there are multiple projects, then there will be an XML file for each of them, but only if the GenerateDocumentationFile is enabled.
And then all the members that have XML comments are listed. Only the constructor of the WeatherForecastController class is described in this case, along with a brief summary. However, if the description had been long, comprising many keys such as param or response, they would have been included as well.
After enabling this property and rebuilding the project, a few warnings will appear informing us that some type or members must be described, as shown in the image below.
These warnings are also from classes that don’t need to be included in the API documentation, like the Startup or the Program classes, so in order to disable the warnings from these classes, the pragma preprocessor directive must be used, as described below.
1 |
The pragma directive takes a few parameters, so there is the pragma-name in this case the warnings that have to be disabled, and then the arguments: disable and 1591 [2]. The last argument is the warning number, which can be found in the Error List window.
Once the useless warnings are disabled, only the useful ones will be seen. In this from the WeatherForecastController class.

After generating the XML file and removing unnecessary warnings, two packages need to be installed in order to generate the Swagger documentation and to visualize it in a more readable way, using a Web page.
Writing XML comments
The XML comments needs to clear and to provide enough information in order for those who want to use the API to understand it without having doubts. There might be some misconceptions about writing comments, but in this case writing these comments will help others to understand what the endpoint does and how to use it, because in most cases they will not have access to the code.
Here are some popular websites that published their API Documentation:
- https://api.stackexchange.com/docs
- https://www.reddit.com/dev/api/
- https://developer.twitter.com/en/docs/api-reference-index
Describing parameters
In the following code, there is a brief summary about what the constructor of the WeatherForecastController class does and the logger parameter.
1 | // <summary> |
This illustrates how the param tag can be set. If there are many parameters, then another param tag under the previous one has to be added [3].
Then in the code below, the returns and response tags are used for the /GET endpoint. These should be the minimum tags needed to be set on an endpoint in order to describe it in an understandable way.
1 | /// <summary> |
Adding Swagger Service Generator
In the Startup class, the Swagger Service Generator must be added, in order to generate the swagger.json file that will be later parsed by a middleware component to display the documentation on a Web page.
For this step, I chose to create an extension method to keep the code organized, but all the code inside this method can be added directly into the Startup class via the ConfigureServices method.
1 | public static IServiceCollection AddSwaggerDocumentation(this IServiceCollection services) |
In the above code, there are the minimum required options in order to generate the Swagger documentation.
On line 5 the API documentation is set up, with the name, title, and version. Then the XML file path of the current assembly is built and passed to the IncludeXmlComments method as a reference that will be used to generate the swagger.json file. All the available properties of the Service Generator can be found on the Swashbuckle.AspNetCore GitHub page https://git.io/JftOr.
Adding Swagger Middleware
As the Swagger Service Generator extension method, there is also one to add two middlewares, one for the Swagger Documentation and another one for the SwaggerUI. These two middlewares can also be added to the Startup class in the Configure method.
1 | public static IApplicationBuilder UseSwaggerDocumentation(this IApplicationBuilder app) |
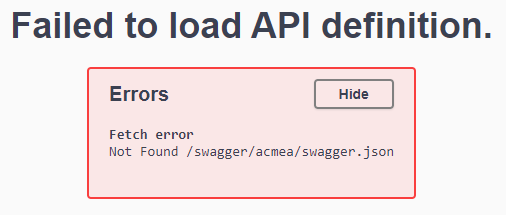
On line 3 the Swagger Documentation middleware is added, that will provide the swagger.json. And then the Swagger UI is added and configured, by specifying the path to the swagger.json file and the name that will be displayed at the top of the page. Please note that what is in between /swagger/ and /swagger.json is the name of the API Documentation that was previously set in the Swagger Generator Service, in this case, the name is acme. If the name is different, then the Swagger Web Page will display the following error.
On line 7 the Expansion option is set to None which will collapse all the API definitions when the Swagger Web Page is opened. This is more of a personal preference. I like to keep those definitions collapsed, because as the application grows, there will be dozens or hundreds of them.
The result
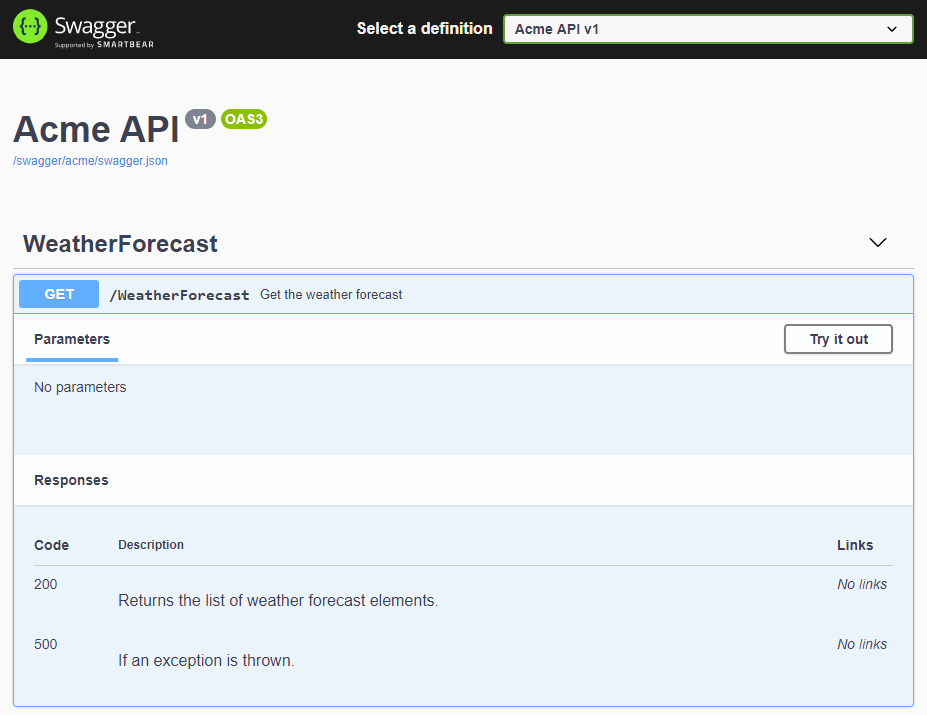
After doing all the above steps, the documentation web page can now be accessed by accessing http://localhost:5000/swagger/index.html. In the picture below is the landing page with the WeatherForecast panel open.
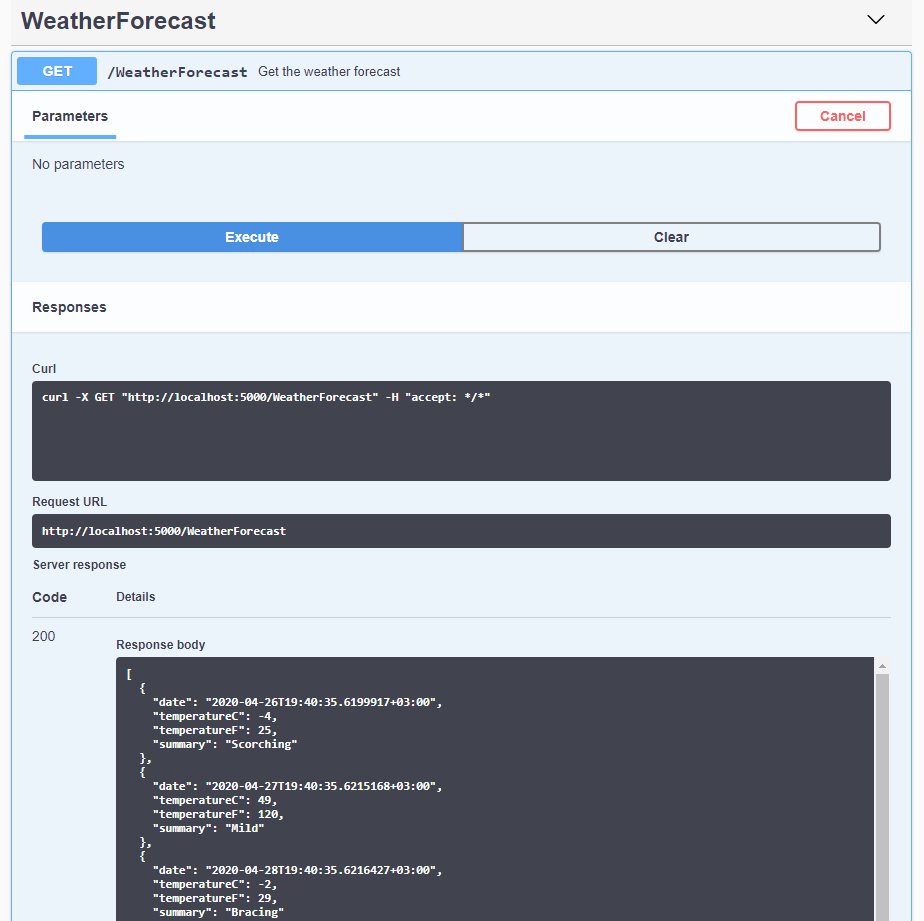
There is a Try it out button through which the endpoint can be tested, this is like testing the endpoint with Postman, Insomnia, or any other REST Client, but much more easily, without having to introduce anything. We’ll see that in the next article where the Bearer Authentication will be added, we’ll have to authenticate only once.
The source code from this article can be found on my GitHub account: https://github.com/StefanescuEduard/DotnetSwaggerDocumentation/tree/master/API.WithoutAuthentcation.
Thanks for reading this article. If you find it interesting, please share it with your colleagues and friends. Or if you find something that can be improved, please let me know.