RabbitMQ Exchange with Docker in .NET
This is the second article from a series of four about RabbitMQ Exchange in .NET. In the first part of this article, the fundamentals and the types of the Exchange will be presented. And in the second part, each line of code will be explained about how the Exchange it will be created. The first article, https://stefanescueduard.github.io/2020/02/29/rabbitmq-producer-with-docker-in-dotnet/, contains a short introduction into RabbitMQ concepts, the Environment setup with Docker and Producer creation in .NET.
Introduction
The RabbitMQ Exchange is used to route the messages received from the Producer and sending them to the Queue based on the routing key key and binding key. Those two keys were explained in the first article, so if you want to find the explanation behind them, read the first article.
An Exchange can be one of these four types:
Exchange types
Direct Exchangesend messages to theQueuesthat have thebinding keythe same as therouting key.Fanout Exchangesend messages to all theQueues, in an indiscriminate way. It uses the Publish-Subscribe Pattern, which means that allQueuesthat are subscribed to anExchangewill receive the message, like a newsletter. Also, it will not take into account thebindingor theroutingkey.Topic Exchangesend messages to theQueuesusing a pattern. The pattern can contain*or#. The first wildcard*means that it can match any word, and the second one#represents that no word is expected in that place.For example, if there are three
Queues, and each one expects to get a ‘word’ based on thebinding key, as follows:Queue1 > word1._._ Queue2 > _.word2._ Queue3 > _._.word3
If the
Producersends the messageword1.word2.word3, eachQueuewill receive only the expected message.A real-life example for this type of
Exchangecan be the different levels of logging (i.e. the errors and warns can be sent to the Database, and the info ones sent to a file).Headers Exchangesend messages based on a header, this header is represented by a required propertyx-matchand one or more properties that will be bound to theQueuelike arouting-key. This type ofExchangeis useful when the message should follow the header values and not therouting keys. It’s also associated with theTopic Exchange, but it’s much more flexible, with the disadvantage that the message should be an object.
A topology can have multiple Exchanges connected to the multiple Producers and Queues, as in the example below, made using http://tryrabbitmq.com.
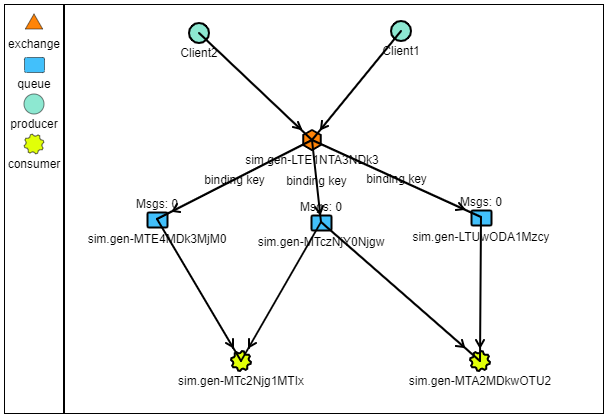
Short explanation; the Producers can be seen as Clients, the Queues as Buffers or as Preprocessor and the Consumers are the applications that receive the messages. In this example the Clients can be considered as a mobile application that sent two requests to the server in order to persist some data, the Buffers are like a middleware which scan the data, and the Consumers are different storages that save the data based on its file type.
Creating the Exchange
This project only covers the first tree Exchange types (i.e. Direct, Fanout and Topic), because the Headers type is a little more special I want to make another article just for it.
This, like the rest of the projects, is a Console Application. First of all, the user is asked which of Exchange wants to create:
Then the connection to the RabbitMQ Server is created using the URI.
In the first article, the connection is created by specifying each property needed. Here the URI consists of following parts: the first one is the protocol used, in this case, AMQP, then the username and the password, and the last section is the hostname or the IP of the RabbitMQ server. The URI can also contain the port, here the default one is 5672.
The ConnectionTimeout is set to the maximum value because the application is desired to run indefinitely, and this value is used to bypass the connection time out.
Exchange definition
In order to establish the connection between our machine and the RabbitMQ Server, the stream must be opened, and through this stream, the information is sent using a Channel.
The exchange name will have the same name for all four projects but is just for this article presentation purposes. On line 6 a safety deletion is executed in order, to ensure that on the next line when the Exchange will be created, there is no other Exchange with the same name. The ExchangeDeclare method will create an instance of an Exchange based on what type of Exchange the user has chosen.
Prompting the definition result
On the last section of the code, the user is informed that the required Exchange was created. You may notice that I didn’t do any type of exception handling, that’s because it’s only for this article presentation. But in a real-world application, I recommend to implement a strong exception handling system and make the other services involved aware if that happens.
The result
Let’s create a Direct Exchange, which will also appear on the RabbitMQ Management plugin.

And now let’s check the Management Exchange page.
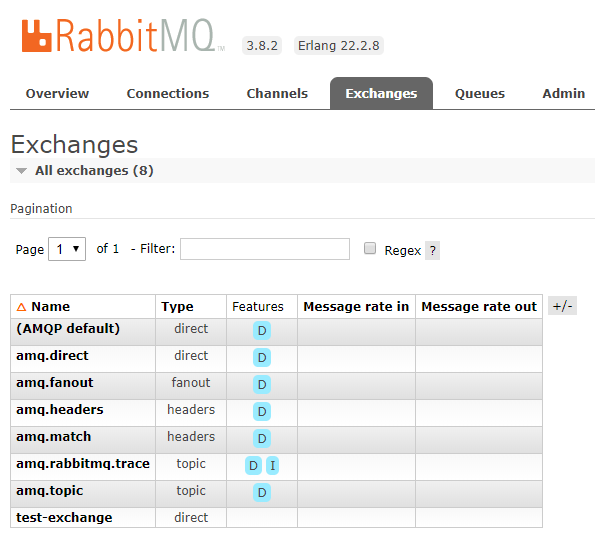
As is showed in this page the test-exchange Exchange was created with the type that the user wanted and is ready to be used.
On the test-exchange dashboard, there a message can be published, as we did in the first article with the Producer. I will demonstrate both ways of publishing the messages in the last article, where the entire system will be connected. And also the Exchange can be deleted.
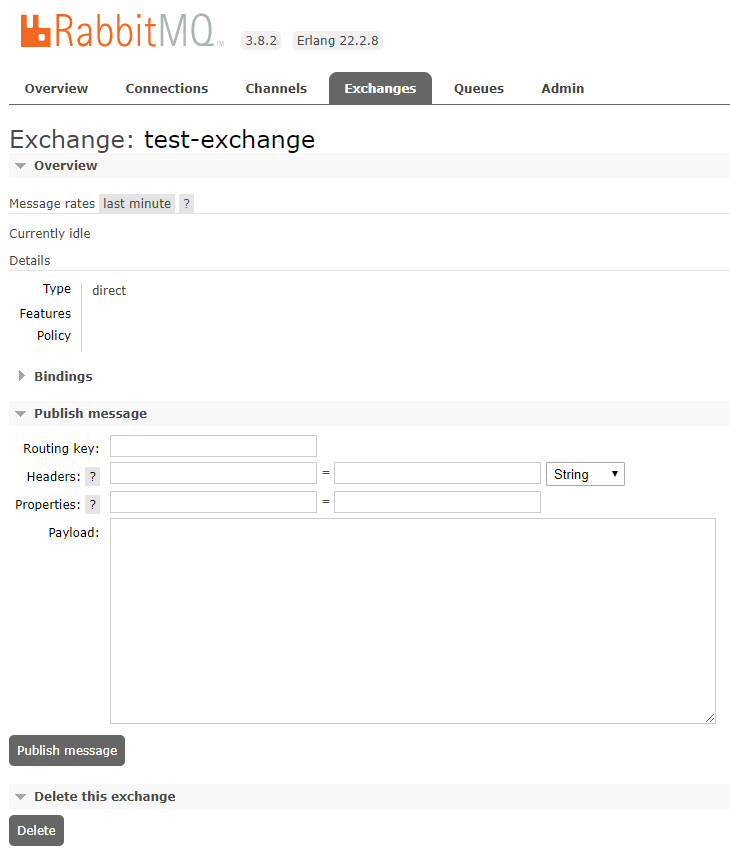
Because the topology currently doesn’t have connected all needed components, on the Message rates the Idle message is displayed, but we’ll see that after the entire system is running, there will be a chart that will show the messages flow, as Publish (In) and Publish (Out).
All the code from the entire solution is available on my Github account: https://github.com/StefanescuEduard/RabbitMQ_POC. But stay close because in the next articles I will explain the core concepts about each RabbitMQ node.
Thanks for reading this article, if you find it interesting please share it with your colleagues and friends. Or if you find something that can be improved please let me know.